Hierbij mijn beschrijving hoe ik de hoedenplank heb gefixeerd:
Na verschillende pogingen met plakband e.d. bleef dat ding het voor me kaar krijgen weer te vallen.
Wie weet heeft iemand anders dit ook al gedaan maar ben hem nog niet tegen gekomen op het internet.
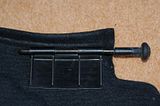
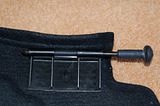
Doe de hoedenplank in de houder en houd hem omhoog.
Kijk tot hoever die komt en markeer aan beiden kanten een stipje.
Maak op dit stipje een klein gaatje door de 2 lagen heen.
Neem een stukje sterk ijzerdraad of een pin(spijker o.i.d.) of iets dat je hebt liggen en vorm hier een oogje aan.
Steek het pinnetje door de gaatjes heen.
Mooi subtiel opgelost en de hoedenplank is ook nog makkelijk te verwijderen.
Permanente Hoedenplank fix (meerdere oplossingen !!)
Moderators: Passiepooh, pumamartin, Puma Moderators
-
gabbagirl
Re: Permanente Hoedenplank fix (gratis)
Ik heb gewoon tape om de uiteinden gewikkeld en nu ligt die steviger in de houder en is er sindsdien nooit meer uitgevallen 
-
Jeroen.
Re: Permanente Hoedenplank fix (gratis)
Met onderstaande How-to van een Engels forum heb ik de hoedenplank gefixt. 
ProjectPuma schreef:Parcel Shelf Fixes
Guide Overview:
This guide will hopefully help you stop the parcel shelf from constantly falling into the boot. It's normally a combination of the hinge / hinge location wearing and the strings not staying on the hatch pins. Sometimes the hinge comes away from the parcel shelf too.
Hinge pin modification
Difficulty: 1/5
Time: 30 mins - 1 hour
Required Tools:Required Parts:
- Hot air gun / Hairdryer
- Scissors
Rather than constantly wrapping electrical tape around the hinge pins, I’ve found that applying heat shrink sleeving is a more permanent fix as it “sets” to a much harder finish than tape ensuring it lasts a lot longer.
- Heat shrink sleeving (*see bottom of article)
- Grommets x 2 (*see bottom of article)
1. Remove Parcel Shelf from car. Work on one side at a time.
2. Apply heat to the 2 plastic hinge sections on the parcel shelf to slightly soften the hinge and allow removal of the metal pin.
3. With the pin out, cut a length of heat shrink to cover the rubber cylinder.
4. Using a hot air gun / hairdryer shrink to fit uniformly around the rubber. (thus increasing its diameter)
5. Insert the metal pin back through the plastic hinge whilst inserting a smaller length of slightly smaller heat shrink to the metal pin between the two hinge parts.
(If you haven't been fast enough with steps 3 and 4, the hinge may have cooled and the pin may be difficult to re-insert. Simply re-heat the hinge and insert the metal hinge.)
6. With the hinge in position, gently heat the central heat shrink to ensure the pin never comes out again.
(The plastic hinges will contract round the metal hinge again as it cools down securing it, but this is just to be sure)
7. Repeat for the other side of the parcel shelf.
8. Wait for the hinge / heat shrink to become cool.
9. Returning to the car – re-fit the hinge back into the hinge location slots. It should be a much firmer push you need now whilst it still pivots.
Before pushing in:
Pushed in:
10. Refit the strings to the hatch pins.
11. Push a grommet over to stop the strings falling off.
Mines lasted over a year now with no signs of wear happy
Hinge to parcel shelf fixing modification
If your plastic hinge has come away from the parcel shelf, then the best way to fix it back is to bolt or rivet it back into position. Using any adhesive will only be a temporary fix due to the vibration and contact surfaces involved (carpet / plastic)
Difficulty: 2/5
Time: 30 mins - 1 hour
Required Tools:
* Drill
* Suitable drill size for Rivet / bolt
Required Parts:
* Rivets or Bolt & nuts
1. Drill through the hinge either side of the mounding to ensure a flat surface using the drill and an appropriately sized drill bit.
2. Place on Parcel shelf and mark the position.
3. Carefully drill the parcel shelf (It's thicker than you think!)
4. Place hinge back on shelf and Rivet / screw as required.
Job Done


-
Jeroen.
Re: Permanente Hoedenplank fix (gratis)
Ik heb die dopjes gewoon met krimpkous gemaakt. Werkt perfect 
-
MiniMan
- Puma Senior

- Berichten: 127
- Lid geworden op: do 18 feb 2010, 5:51 pm
- Facebook Pagina: http://www.facebook.com/#!/MiniRogier
- Locatie: Duiven
- Contacteer:
Re: Permanente Hoedenplank fix (gratis)
Wat heb je nodig:
-2 Zwarte elastieken, deze zitten op tuinslangkoppelingen zie hieronder, zijn los tekoop hoor


1. Doe deze elastieken dubbel om de voet van het koord, zie foto
2. Bevestig het koord zo als je dat altijd doet, en rol daarna het elastiek over de grote opening
Dan de hoedenplank zelf, zo valt die er niet meer uit:

3. Druk het rubber van de hoedenplank goed strak tegen het kunststof aan, dat die goed klem zit

4. Doe hetzelfde ook aan de andere kant
Hoop dat het zo duidelijk is, alles is nu nog te demonteren zonder gereedschap en de elastieken zijn los tekoop bij de bouwmarkt/tuinwinkel
-2 Zwarte elastieken, deze zitten op tuinslangkoppelingen zie hieronder, zijn los tekoop hoor
1. Doe deze elastieken dubbel om de voet van het koord, zie foto
2. Bevestig het koord zo als je dat altijd doet, en rol daarna het elastiek over de grote opening
Dan de hoedenplank zelf, zo valt die er niet meer uit:
3. Druk het rubber van de hoedenplank goed strak tegen het kunststof aan, dat die goed klem zit
4. Doe hetzelfde ook aan de andere kant
Hoop dat het zo duidelijk is, alles is nu nog te demonteren zonder gereedschap en de elastieken zijn los tekoop bij de bouwmarkt/tuinwinkel
Binnenkort trotse eigenaar van een zwarte Reanault Clio 1.6 16v full options

Re: Permanente Hoedenplank fix (gratis)
Ik heb mijn hoedenplank vastzitten met zo'n metalen klemmetje van TuningHaus.
Kost € 10,00 maar werkt hardstikke prima en de hoedenplank blijft verwijderbaar.
http://www.tuninghaus.de/shop/product_i ... _68_69_360
Idee met krimpkous erom werkt wel maar houd er rekening mee dat je die horizontale kunststof U (geen idee hoe ik dat anders moet omschrijven) waar je die as in duwt extra uit elkaar drukt en deze kan daardoor een keer kapot gaan.
